
Table of Contents
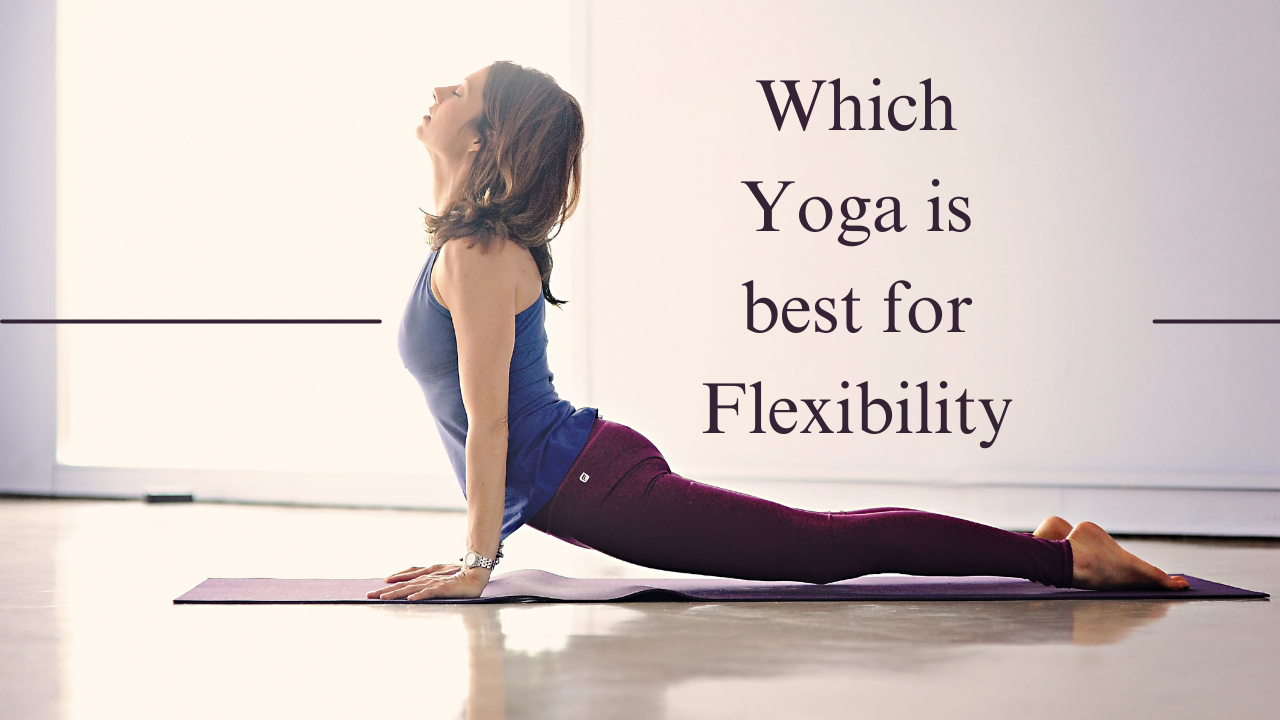
If you are searching to know, “Which Yoga is best for Flexibility in 2024 for beginners, then your search ends here. Here, in this article you will learn how you can increase your flexibility in simple and effective ways.
What is Flexibility?
Flexibility refers to the ability of the human body to perform a pain free range of motions for performing various physical day to day tasks easily without having any difficulty. Here in this article we are going to discuss about what actually flexibility means, what are the types of flexibility in a human body, and how yoga can help a person to improve flexibility. There are some basic yoga poses that can help a person improve flexibility easily at home.
Types of Flexibility
There is a serious confusion out there about what flexibility actually is, when it comes to stretching, flexibility and mobility training.
The 3 Types of Flexibility
- Dynamic Flexibility
- Active Flexibility
- Static / Passive Flexibility
Research has shown that individual joints as well as the entire body, work optimally when all 3 types of flexibility are achieved equally.
Defining the 3 types of Flexibility
1. Dynamic Flexibility
Dynamic Flexibility is the ability to move through a joints range of motion, which means that you can swing your legs through your hip’s range of motion.
2. Active Flexibility
Active Flexibility is the ability to hold a position, mostly near an end- range of motion of a joint by contracting the muscles of the agonist and synergists and allowing the antagonist(s) to relax and stretch which means that you can use your quadriceps and glutes to relax and stretch your hamstrings.
3. Static / Passive Flexibility
Static or Passive Flexibility is the ability to hold a position, mostly near an end-range of motion of a joint using external forces which means that you can sit cross legged without stiffness or pain.
Why is Flexibility Important?
Flexibility plays a vital role in performing our day-to-day tasks with ease, from simply walking to running or going to schools and offices for studies and work, playing games, or doing normal household or daily routine works. Flexibility is very important in every part and it can be improved by doing various simple yet effective yoga poses at home.
Here are some key points as to why flexibility is important in one’s life.
- Greater range of motion:- Increased flexibility makes it easier to move your joints in a normal direction with less effort.
- Less muscle tension:- Stretching your muscles can help release tension and tightness, making it easier to move.
- Better Posture:- Tight and tensed muscles can lead to muscle strain and poor and bad posture.
- Less Pain:- Released muscle tension will lead to less stress and pressure on certain parts of your body resulting less pain in back, neck and shoulders.
- Lower risk of injuries:- Greater strength and flexibility in your muscles and joints will surely make you less prone to injuries.
- Less stress:- When tension is released in your muscles, it might help you feel more relaxed that might lower your stress levels.
- Improved Blood Circulation:- Better blood flow may help your muscles recover more quickly after a workout and also prevent stiffness.
How does Yoga help in improving flexibility?
Yoga, unlike other forms of exercises, is done in a very gentle and slow manner as it helps in relaxing, soothing and strengthening. The yoga poses and its variations stretches, activates and revitalizes every bone, muscle, tissue and ligament of the body that has been engaged in doing that particular yoga pose. Obviously, it may not make you flexible within a day but surely in a week or so you will going to see noticeable changes and results in your body.
Also, it is very important to keep the form and alignment and breathing pattern of the yoga pose correct as if not done properly it may not provide you it’s wholesome benefit but in turn cause an injury.
Best Yoga Poses for Flexibility
1. Downward Facing Dog ( Adho Mukha Svanasana)
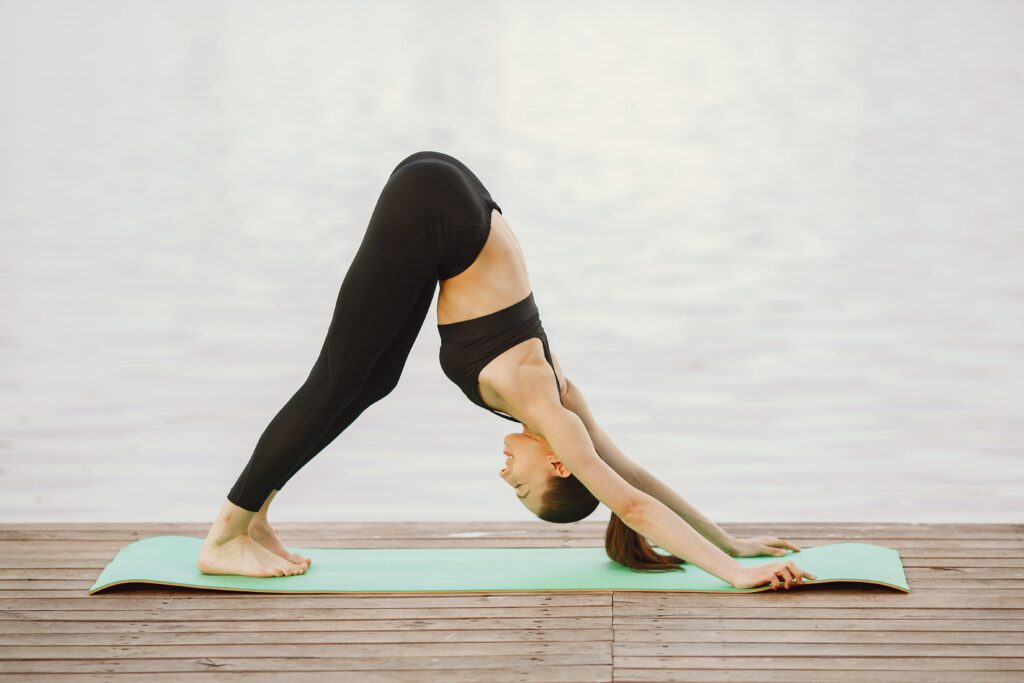
Downward Facing Dog or the Adho Mukha Svanasana Pose is one of the most popular and widely recognized yoga pose for increasing flexibility, strengthening and stretching. It strengthens your wrists, arms and shoulders along with stretching your wrists, hamstrings and entire back body.
The Posture lengthens your spine, it counteracts the effects of prolonged sitting and improves posture.
Steps for performing the yoga pose
- Place your both the hands on the ground.
- Keep your hands on the ground as wide as your shoulder’s width.
- Open up your fingers and palms fully pushing the ground firmly.
- Tuck your toes together and put them back lifting your torso up making a triangle or a mountain shape with your body.
- Exhale as you lift up your body gently and hold the position for a moment.
2. Cobra Pose (Bhujangasana)
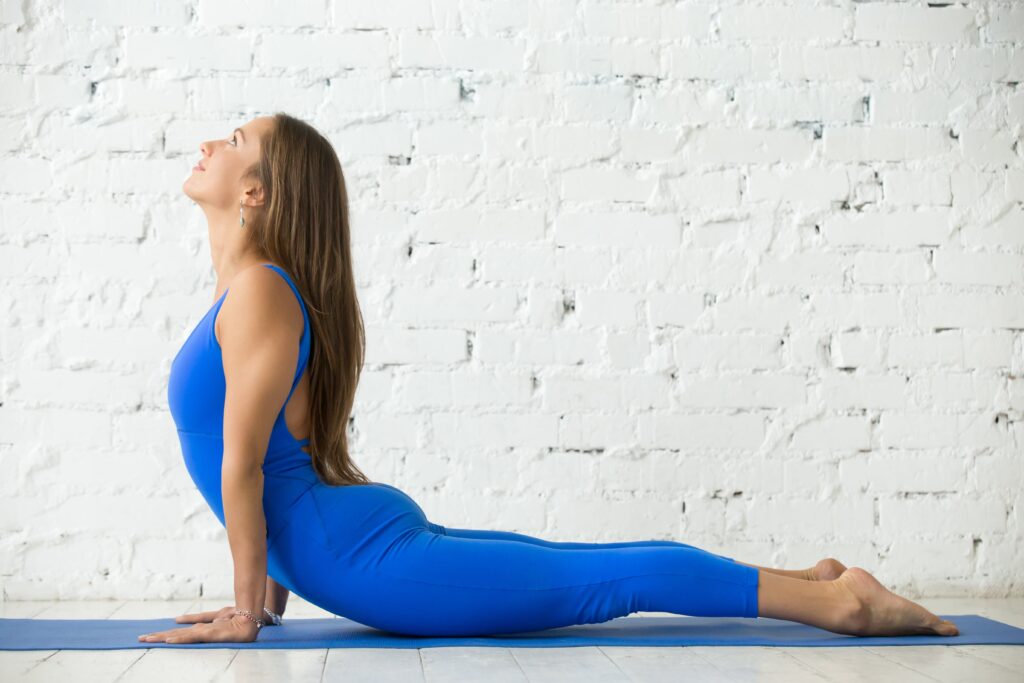
The Cobra Pose or the bhujangasana is one of the most effective yoga pose when it comes to building strength and flexibility. This pose stretches your back and neck making your spine flexible and it also strengthens your legs, wrists, elbows and shoulders. While performing this pose, you make your body posture like that of a hooded serpent or the cobra, from that it got its name “The Cobra Pose or The Bhujangasana”.
Steps for performing the yoga pose
- Lie down comfortably on your stomach.
- Keep your legs together and your feet tuck firmly.
- Place your hands on both the sides of the chest and your palms touching and pressing the ground.
- Now, gently lift your head, chin, chest and torso upward taking the support of both your hands.
- Try to look towards the sky or the ceiling of the room.
- As you lift your body upward, breathe in oxygen in your chest and try to hold it for sometime.
- Now gently as you come down to the floor again, breathe out and exhale.
3. Standing Forward Bend (Uttanasana)

The Standing Forward Bend or The Uttanasana, is also a simple yet powerful yoga pose for increasing flexibility and strength. In this pose you fold your upper half body and try to touch or hold your ankles with your palms.
This pose not only stretches your spine but also stretches your hamstrings making them more strong and flexible. It also improves your digestion and relaxes the brain too.
Steps for performing the yoga pose
- Stand straight on the ground and put your both the feet together and place your hands on both of your sides.
- Now lift both your hands from your sideways to all the way above your head.
- As you lift your hands above your head, breathe in and inhale in your chest.
- Now slowly move your hands, head and your torso down towards your feet.
- As you bend down, try to hold your ankles with your palms.
- Exhale completely while going downwards.
- Hold in this position for a minute or so and then come back to the normal position.
4. Seated Forward Bend (Pashchimottanasana)
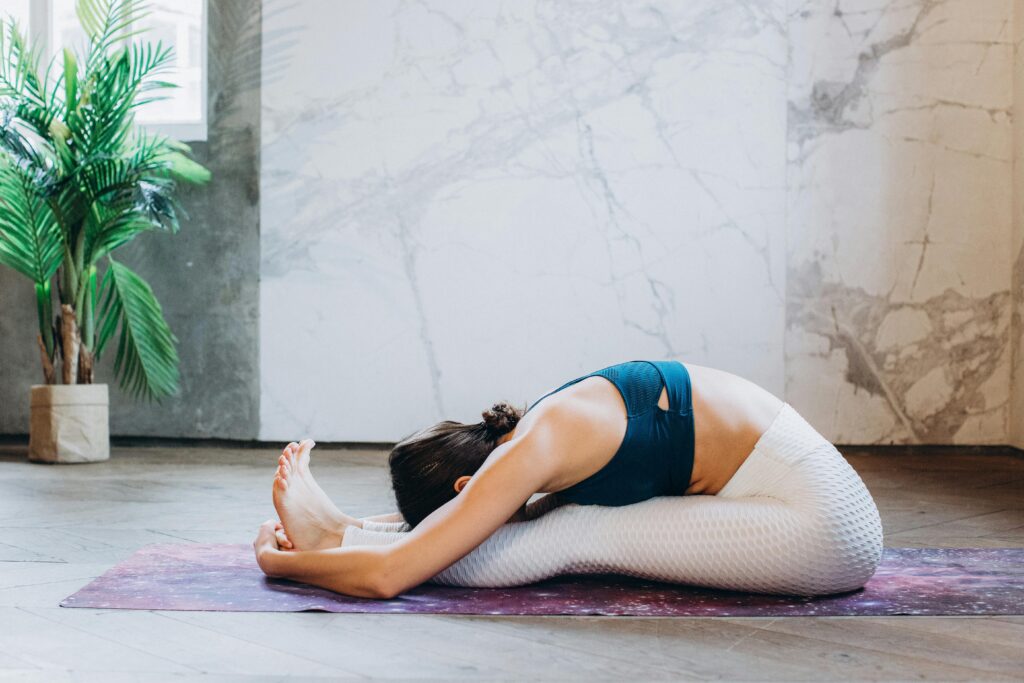
The Seated Forward Bend or The Pashchimottanasana is also one of the most recommended yoga poses when it comes to improving flexibility. It is a seated forward bending pose which stretches the back and shoulders which helps in overcoming pain and stiffness in the back and shoulder muscles. It stretches the spine making it more flexible and mobile. This seated pose also gives relief from the tightness and aches in the hamstrings.
Steps for performing the yoga pose
- Sit comfortably on your yoga mat with legs straight and put both of your feet together.
- Keep your back and spine erect.
- Now gently lift both your hands above your head and deeply breathe in simultaneously.
- Now gently lean forward your whole upper body along with your hands and try to touch the soles of your feet with both your hands making and interlock position with your fingers around your feet.
- Try to touch your forehead to your knees.
- As you lean down forward breathe out gently.
- Hold this position for sometime and then return back to the normal position.
5. Cow Face Pose (Gomukhasana)
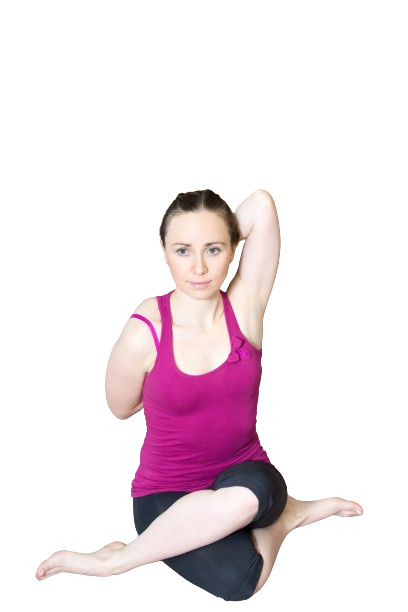
Gomukhasana or The Cow Face Pose is one of a type of Hatha Yoga practised by ancient yogis and seers for thousands of years. This is a perfect yoga asana to stretch and make one’s body flexible. It stretches the chest and the shoulders and opens the hips when you sit in sukhasana or the cross-legged position. Also, as it appreciably stretches the chest, shoulders and spine, it also improves the whole body posture and relieves aches too.
Steps for performing the yoga pose
- Sit on the ground with your back straight and keep your legs straight infront of you putting them together.
- Now, fold your right leg and place and firmly tuck it under your left hip.
- Now fold your left leg and and then overlap it on your right leg.
- Keep your back straight.
- Lift your left arm straight up in the air above your head and then fold your left arm reaching backwards.
- Now bring your right arm behind your back and then try to interlock both your hands from backwards.
- As you reach to the final position breathe in and inhale.
- Hold this position for sometime according to your tolerance power and then come back to the normal position.
- Now repeat the whole asana again from the vice versa legs and hands.
6. Pigeon Pose (Eka Pada Rajakapotasana)
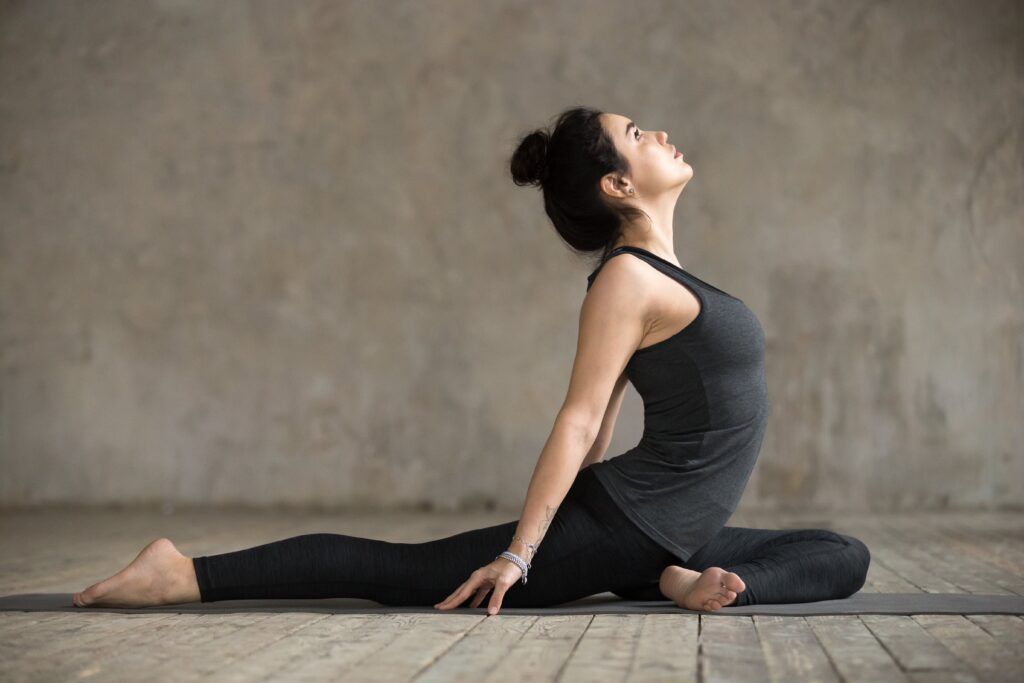
The Eka Pada Rajakapotasana or The pigeon pose is the best pose for increasing the strength and flexibility of the body parts such as the glutes, the hamstrings, the quads, the hip flexors, the adductors, the abductors, the spine, the neck, the knees and the ankles. It also alleviates pain and stiffness and stimulates abdominal organs. Practising this asana can also reduce the pressure and irritation on the lower back and the sciatica nerve.
Steps for performing the yoga pose
- Firstly, start in the downward dog position with both hands and feet on the ground and stretch and lift your hips up in the air.
- Now raise your right leg up and bring it forward and place your right knee behind your right wrist and your right ankle near your left hand. Your right shin should be parallel to the front edge of the mat.
- Bring your left leg back and stretch it back straight putting it firmly on the ground with your toes pointing back.
- Your front of the feet should be facing towards the groung in the downward direction.
- Your hips should level and square to the front of your mat.
- Now, breathe in and lift your upper body lifting your chest and your head upfront elongating your spine and giving it a full stretch.
- Hold this position for sometime and then repeat the whole procedure switching your legs.
7. Triangle Pose (Trikonasana)
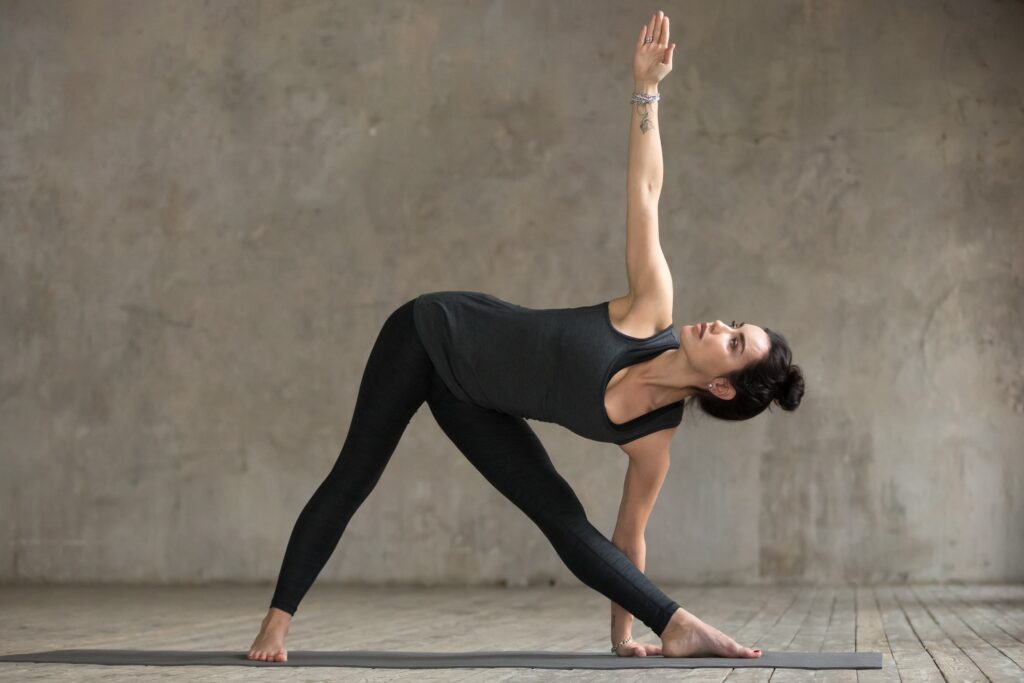
Triangle Pose or the Trikonasana mainly focuses on stretching the body sideways and helps improve spinal flexibility. This pose also lengthens the muscles of the legs improving the strength of the calves, thighs, hips and the legs and enhances the flexibility of the hamstrings too.
Steps for performing the yoga pose
- First of all, stand straight on both the feet firmly and make a distance of 3 feet apart between both of your legs.
- Now, lift your both the arms sideways and lift them to the level of your shoulders.
- Now twist your right foot towards your right side.
- Start bending to the left side gently trying to touch the right feet from your right hands fingers.
- At first, if you are unable to touch the right feet then try to touch your right knee instead.
- Now as you touch your right foot, inhale.
- Your left arm should line up straight with your right arm.
- Turn your head to the left in the upward direction in the bent position only and try to focus on the middle finger of your left hand.
- Hold this position for sometime.
- Then repeat the procedure from the left side also.
8. Butterfly Pose (Baddha Konasana)
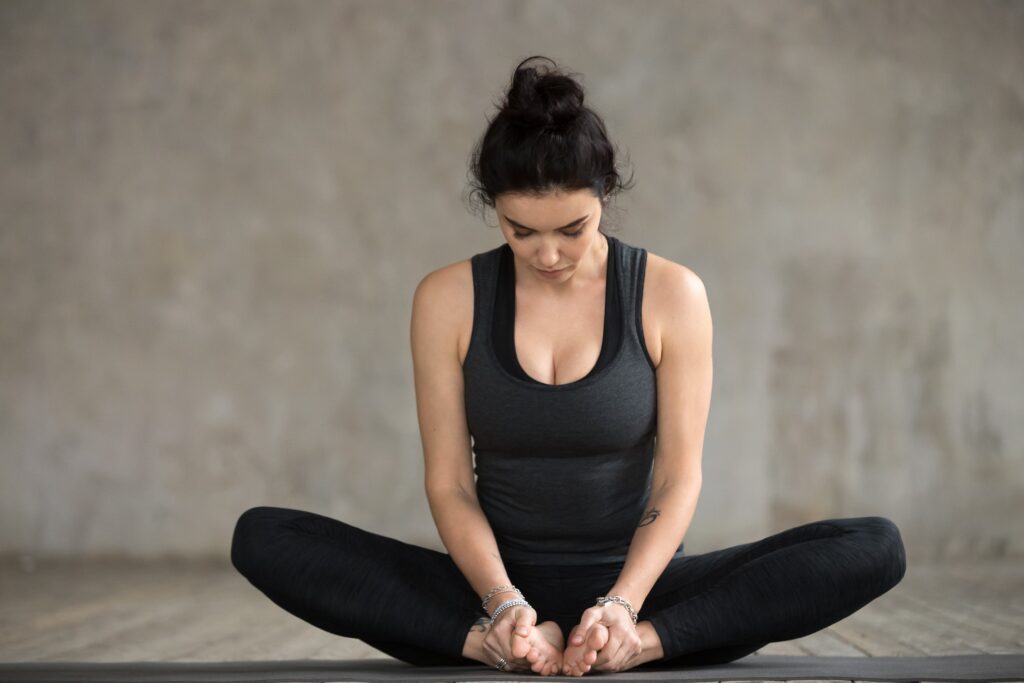
Butterfly Pose or Baddha Konasana is a classic hip opener which improves flexibility and reduces tension. It also deals with the problem of tight hips from excessive sitting or high intensity workouts. This yogasana focuses on the hip portion and opens up and tones the inner thighs, back and buttocks.
Steps for performing the yoga pose
- Sit on your yoga mat comfortably with your back straight.
- Now bend both of your knees and join both the soles of your feet together.
- Hold both the joined feet with your hands interlocking around them so as to maintain the firm grip on the feet position.
- Bring your joined feet as much as close to your genitals to give a good stretch to your lower back, hip, thigh and groin area.
- Gently, try to press both your knees against the ground.
- Now start flapping both your bent knees and legs up and down like the wings of a butterfly.
- At first, flap gently and as you catch to the rhythm and the flow of the movement, then gradually increase the speed gently.
9. Bridge Pose (Setu Bandhasana)
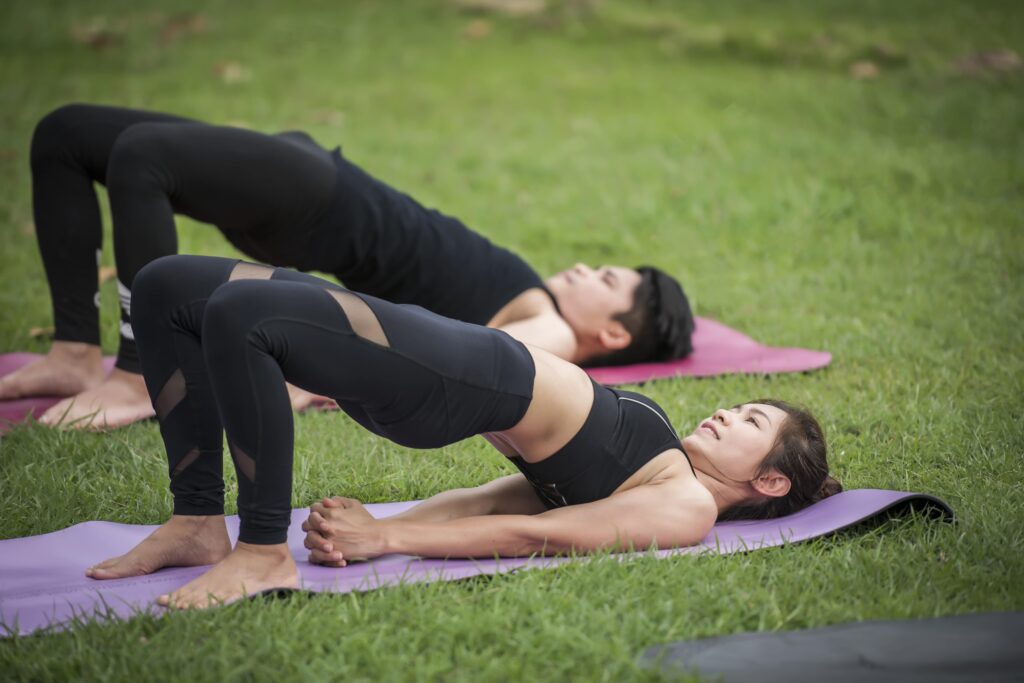
The Bridge Pose or the Setu Bandhasana falls under the category of the basic Vinyasa Yoga. It stretches neck, vertebral column and the upper body (thorax) and also strengthens the back, neck, chest and legs. This yoga pose not only strengthens and stretches your body parts but also opens up your chest and lungs and tones your thighs, glutes, hips, hamstrings and calves too. As this yoga pose opens up your chest and lungs, it is also very beneficial to relieve the symptoms of sinusitis and asthma.
Steps for performing the yoga pose
- To start this pose, first of all lie down on your back on your yoga mat.
- Fold your knees and keep your feet and hips, approximately 1 feet (12 inches) apart form your pelvis and keep your knees and ankles in a straight line.
- Keep your arms beside your body with arms facing down.
- Now as you lift your lower back, middle back and upper back off the floor, breathe in gently and deeply.
- Gently roll in the shoulders and touch the chest to the chin without bringing the chin down.
- Support and balance your weight with your shoulders, arms and feet.
- Feel your bottom firm up in this pose and both the thighs should be parallel to each other and to the ground.
- According to your wish, you could interlock the fingers of both palms and push the hands on the floor to lift the torso a little more up, or you can support your back with your palms.
- Hold this position for sometime and then relax.